In this article, we are looking at how to download emails to an Offline PST File using Microsoft Outlook. The procedure below assumes that you already have the email account configured in the specific email application. If you have not already set up your email account, then you will need to do so before you can create an export.
Why Create an Offline PST File:
There are many reasons to download and keep your emails on your hard drive in a PST Format such as to:
- Keep important information and documents.
- Have offline access.
- Keep all emails in one place.
- Free up and get extra storage on your mail account.
- Customize your emails.
- Migrate to a different email service.
- Close your account.
- Share specific email threads, attachments, or folders.
There are common ways for downloading your emails that you probably are already doing:
- Download a single email or thread. You can normally just drag and drop from your Inbox or folder to a location on your hard drive and an msg or eml file will be created containing a copy of the email and its content. Or you can select the message and COPY (CTRL-C) and then PASTE (CTRL-V) to a location on your hard drive.
- Download an email attachment. You probably do this already where you save an attachment to a location on your hard drive.
- Download any folder. This is a little more involved, but you can select all the messages in a folder and then drag and drop them to a location on your hard drive and msg/eml files will be created for you. You can also copy and paste them.
Note: when you drag and drop or copy and paste, the mail application may use the subject of the email as the filename. This is normally fine until you have lots of emails in the thread that have the same subject, and then the application will add a (X) where X is a number and it will increment it for all the emails that have the same subject/filename. It may or may not follow a specific order when it does the export as it depends on how you selected the message(s) and what your folder sort options may have been when you initiated the copy.
You can download emails from different email providers such as MSN, Hotmail, Gmail, iCloud, etc. using an email application or depending on the service there may also be options to Export your mail without having to use an email application.
How to download emails using the Outlook Application:
To download data from outlook app and export it as an Outlook Data File (.pst).
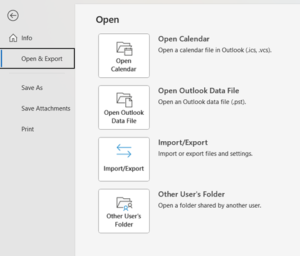
Select File > Open & Export > Import/Export:
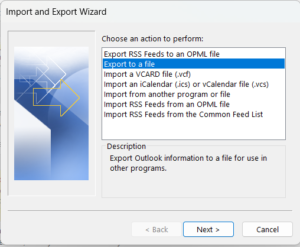
Then select Export to a file:
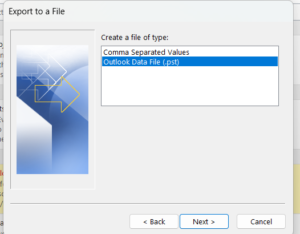
Choose Outlook Data File (.pst):
Next, select the folder you want to back up… you may also choose to select the entire Mailbox by selecting the upper most level in the Tree which has the email address / account noted:
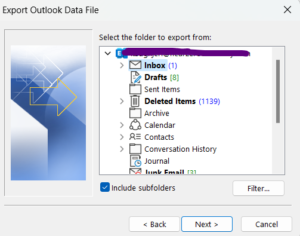
You will usually want to also “include subfolders” especially if you are wanting to export the entire mail box.
Next, Choose the location and name for your backup file. We would suggest something descriptive for the file name in a format like: <EMAIL ACCOUNT>_Backup_<DATE>.pst – it is also recommended to replace any special characters with an underscore…
Example: joe_smith@mail_com_Backup_14DEC2023.pst
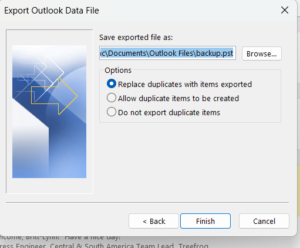
- The Replace duplicates with exported items option will overwrite existing data with the new version of an item being exported.
- The Allow duplicate items to be created option allows copies of existing data to be added over repeated exports.
- The Do not export duplicate items option causes only the data that has been added since the last export to be saved.
We would recommend that you “Allow duplicate items to be created”, because if you were going to use this data for an eDiscovery project, knowing that a duplicate copy of an email was in another folder may be relevant to the matter/investigation.
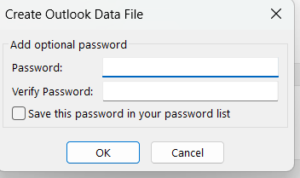
You can now also set a password for your file if you want to as well:
.
Once the Export finishes, you will be able to navigate to the file location to see the PST File that you created.
To be able to read the content of the PST File, you will need to Open it in Outlook. Select File > Open & Export > Open Outlook Data File, you will then need to navigate to the file location where you saved the exported data, and select the PST file. It will then show up in the Left Hand Navigation Menu for you to access.
Related Blog Articles:
| Microsoft 365 Core eDiscovery https://rewcomputing.com/microsoft-365-core-ediscovery/ | Google Suite: Using Takeout |
| Microsoft 365 Advanced eDiscovery Part 1
https://rewcomputing.com/microsoft-365-advanced-ediscovery-part-1/ |
Google Suite: Data Export Tool |
| Microsoft 365 Advanced eDiscovery Part 2
https://rewcomputing.com/office-365-advanced-ediscovery-part-2/ |
Google Suite’s eDiscovery Tool: Vault
https://rewcomputing.com/google-suites-ediscovery-tool-vault/ |
Would you like to learn more about our services? Email [email protected] or call 289-803-9730. We would be happy to share more details about our self-service or fully managed eDiscovery services!


